Can't upload images to WordPress [2026] 💥
Sometimes, when you upload images frequently to your WordPress website you might encounter an error message. This could be because you cannot upload images to WordPress or to the WordPress Media Library.
But don't worry, even the most complex image uploading problems like media files that are not showing up in the upload folder can be corrected. This article will address the causes of image upload issues in WordPress as well as offer 14 effective ways to troubleshoot or correct.
Advertisement
1. Checking File Permissions
So you can't upload images to Wordpress. WordPress can fix the problem of image uploads by changing file permissions. These are the steps:
- Connect to your Wordpress files on the server using Cpanel's filemanager or an FTP client, Plesk or any other system you might use. We are going to change file permissions on the "Upload" folder. This folder is located in public_html/wp-content/.
- Right click on the "Upload" folder and select "File permissions" (Filezilla) or "Change permissions" (Cpanel).
- In the number value box, type 755.
- Make sure to check the box next the option "Recurse in subdirectories".
- Choose the radio option that reads "Apply to directories only".
- Click the "OK" button.
Settings should be just like in the screenshot.
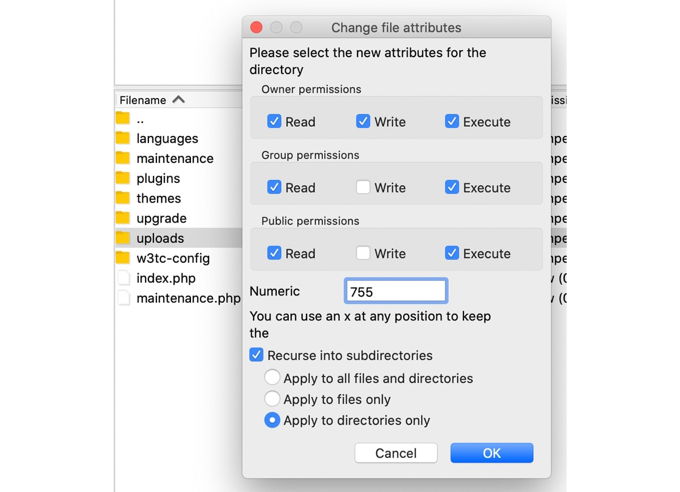
If you still can't upload files to your Wordpress, then repeat this process with box value number 644 and "Recurse in subdirectories" and "Apply to files only". This way the directories have 755 permissions and the files inside of them 644 permissions. Go to the next method if there is still a problem with uploading.
2. Clear Website Cache
You are probably using one of the great cache plugins there are for Wordpress to speed up your website. All of these plugins have an easy way in the topbar of your backend to clear the cache as can be seen in the screenshot below.

3. Purge Cloudflare Cache
If you are using Cloudflare or another CDN, then clear/purge the cache there as well. Then you can try to activate the "Development Mode". Sometimes it is even better to temporarily change your website's name servers back to the ones of the origin server. This way we can be sure the problem has nothing to do with your CDN.

4. Uploading images from other Device
To be 100% sure the problem has got nothing to do with your PC or Laptop, try uploading an image to your Wordpress from another device preferably with a different internet connection. Your cellphone is therefore the best way to try this as it uses a different network.
5. Checking the File Size
The server may also find that the file is too big in terms of dimensions or file size. To reduce the size of an image, you can use compression tools. You can also edit the max values on the server. Below lines can be copied to your php.ini file.
upload_max_filesize = 256M
post_max_size = 256M
max_execution_time = 500
On my server I am using 2000M instead of the 256M I just told you, it is up to you. If you are not sure how to get these line in your php.ini then read my article "Wordpress Max Upload Size" first. There are several other ways to do this as well.
6. Not a Valid File Name
WordPress image upload problems can be caused by file names that contain special characters (# ...), *, and, &) or accent letters (ñ,á,ô,é,æ, etc). This will allow you to rename the file, remove accents and special characters, and then upload it again to WordPress.
7. Memory Limit Increase
When you try to upload an image to WordPress, you may experience an HTTP error. This can happen when the server is experiencing low server resources or if there is unusual traffic to the server. It is worth waiting a while before you re-upload the image. If the problem persists, you may go over the WordPress memory limit.
- You can use FTP or your Cpanel file manager to locate the file wp-config.php in the public_html of your hosting.
- Open the file and paste the below code at the bottom. This will increase the memory limit to 256M. A powerfull server can handle 512M as well by the way.
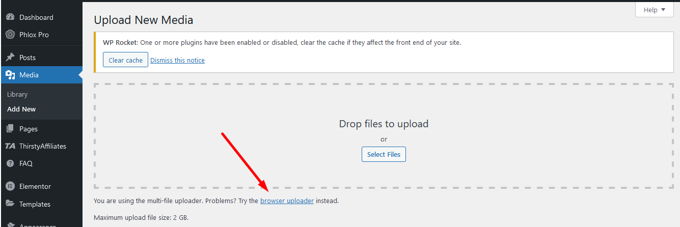
- In your backend go to "Media" >> "Add new".
- Click on "browser uploader". See screenshot below.
- Click the Choose File button. This will open the File Selection Dialog, where you can choose an image to upload as normal.
- Click "Upload".
- To test this fix, upload an image with the WordPress standard uploader.
- You can use FTP or your Cpanel file manager to locate the file wp-config.php in the public_html of your hosting.
- Open the file and paste the below code just below the text "That’s all, stop editing. Happy blogging".
- Now go to the folder wp-content which is also located in the public_html of your hosting. There you create a new folder named "Temp".
- Now try to upload an image to Wordpress to see if the problem has been solved.
define( 'WP_MEMORY_LIMIT', '256M' );8. Use the Browser Uploader
If none of these solutions work and you still have problems, you can try the browser's built-in file uploader. Drag-and-drop and multiple file selections are not supported by the browser uploader. This workaround may help you upload files quickly in some instances.
9. Use a different Browser
Sometimes, HTTP can be problematic when you use Google Chrome. You can change your browser to determine if your website is the problem. Try with Firefox.
10. PHP Version Check
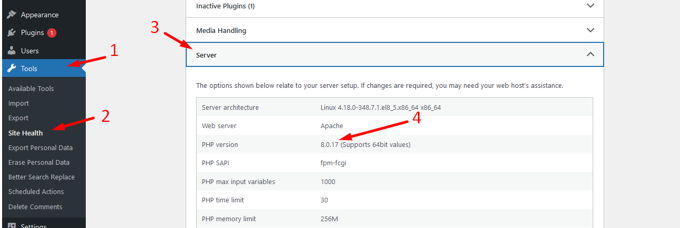
At this moment anything lower then PHP version 8 could cause trouble for your website. Support for version 8.0 and 8.1 will end on 26. November, [2026]. So as off December 2024 you server should run 8.2 or higher. If you are on a shared server/hosting you have to contact your hosting provider. If you lease a server yourself you can make the changes yourself with the MultiPHP Manager (Cpanel).
Check the version your website is using at the moment by going to your WP-backend. Go to "Tools" >>"Site Health". Click "Info" and scroll down to the "Server" section.
11. Temporarily deactivate All WP-Plugins
It is always possible that a plugin is the reason for some malfunction. In this case, not being able to upload images. To test this, you must temporarily deactivate all plugins. If you can now suddenly upload images to Wordpress, then a plugin was really the problem.
To find out which plugin it was exactly, you will now re-enable the plugins 1 by 1. In between, you always test whether you are still able to upload images. The moment this fails again, you have discovered which plugin it was. Unfortunately this is a time consuming activity but sometimes there is no other solution.
12. Image editors on single Thread
WordPress uses GD Library and Imagick as its default image editors. These editors allow you to process images in multiple threads which speeds up the display of images. Some web hosts don't support multi-thread. An HTTP error could occur if an image file is uploaded.
To resolve the issue, you'll need to modify the.htaccess file a bit by adding the code below. The .htaccess file can be found in the root of your hosting: the public_html. See screenshot below.
SetEnv MAGICK_THREAD_LIMIT 1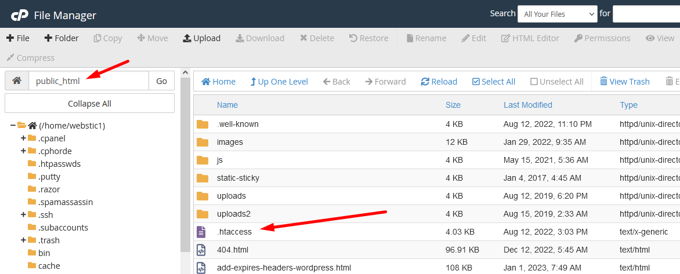
Verify that the problem of an undefined image being uploaded has been resolved.
13. Fixing Missing Temp-Folder Error
Users are unable to upload images, update WordPress or add new features to their site if there is a temporary folder missing. This error could be caused by your web server's PHP settings. You can store data in temporary folders depending on your PHP settings. These files must be moved as soon as possible.
WordPress must have permission to access these folders in order to upload an image, update WordPress or install a plugin. These folders will not be accessible and you will get an error message called Missing temporary folders. These are the steps to follow.
define('WP_TEMP_DIR', dirname(__FILE__) . '/wp-content/temp/');14. Go Daddy specific problem
GoDaddy is a well-known web hosting company. GoDaddy uses cPanel. To correct an HTTP error while uploading an image to GoDaddy, copy the following code and paste it into your function.php file.
<?php
add_filter( 'wp_image_editors', 'webstickblog_change_graphic_lib' );
function webstickblog_change_graphic_lib($array) {
return array( 'WP_Image_Editor_GD', 'WP_Image_Editor_Imagick' );
}
?>
This has to be done in the child theme of course or with your next theme upgrade your changes to the file will be lost. You can use Cpanel's file manager or via your Wordpress backend "Appearance" >> "Theme File Editor" to find functions.php to edit it. It is located in the root of your theme folder and in your child theme as well of course.
Advertisement
