Add Meta Tags to WordPress [2026] 💥

I'm not going to explain what meta tags are, like most sites do. The fact that you landed on this page tells me you already know this. The easiest way to add meta tags to WordPress for most of you is to install a plugin, so let's start with that. 😊
Advertisement
1. Add Meta Tags to WordPress Using the Plugin "Yoast SEO"
The most important meta tags are the meta page title and the meta page description. If these tags are enough for you, the best plugin is Yoast SEO, which is used by 5 million people. 🌟
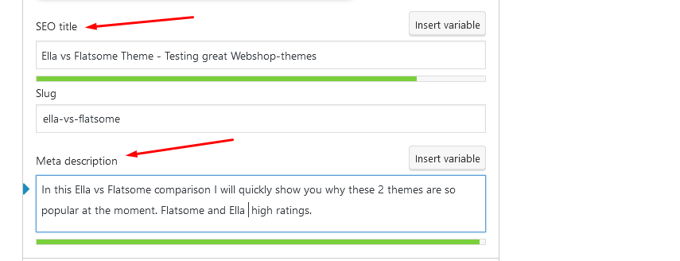
In your WordPress back-end, go to "Plugins" >> "Add New". Use the search box, type: "Yoast SEO". Install and activate it. Yoast lets you add title and description tags for each page and post separately. Just open a post or page and scroll down to where you find this section in Yoast as shown below in the image.

2. Add Meta Tags to WordPress Using the Plugin "Meta Tag Manager"
If you want to add specific meta tags on all your pages, like tags for language, favicon, indexing for search engines, alternate language tags, or any other meta tag, it's better to use a different plugin. This tutorial will show you how to add them with the Meta-Tag Manager plugin. 🚀
In your WordPress back-end, go to "Plugins" >> "Add New". Use the search box, type: "Meta Tag Manager". Install and activate it.
Now go to "Settings" >> "Meta Tag Manager" >> "Custom Meta Tags".
You can now create global meta tags and assign them to different sections of your site. Let's suppose you want to add author meta tags for all posts on your site. The settings would be as follows: Tag type= name, Name-value= author, Where to display this tag= Posts. Just select from the options the plugin already gives you (or add your own tag).

3. Add Meta Tags to WordPress Using the header.php File
Before you start, be aware that any changes made to your theme will disappear after a theme upgrade. Using this method requires a child theme. With a child theme, changes to header.php won't disappear when upgrading your theme.
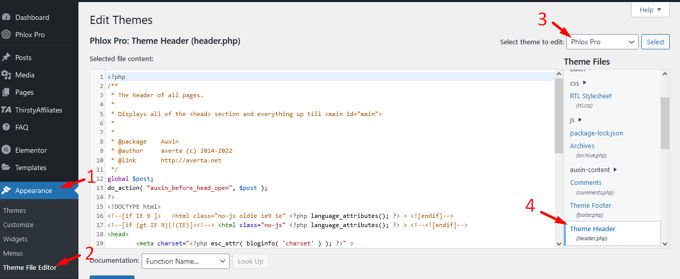
Go to "Appearance" >> "Theme File Editor" in the back-end of your WP-website. Select your child theme, then the file as shown below. The header.php file will have the name "Theme Header". Clicking on it will open it. You can then add your meta tags below the <head>. The tags you place here will be global, so they'll be on all your pages and posts. 🌐
Some examples of possible tags to use:
<meta name="rating" content="general" />
<meta name="geo.placename" content="Amsterdam" />
<meta name="geo.position" content="52.367043;4.836026" />
4. Add Meta Tags to WordPress Using the functions.php File
Go to "Appearance" >> "Theme File Editor" in the back-end of your WP-website. Select your child theme, then the file as shown below. Save the file after adding the PHP code below with your meta tags to the content of functions.php. Where it says "replace_this" enter the right information. 🛠️
/**
*
* Add custom Meta Tag to header.
*/
function custom_header_metadata() {
  ?>
  <meta name="replace_this" content="replace_this" />
  <?php
}
add_action( 'wp_head', 'custom_header_metadata' );
Comparison of Methods to Add Meta Tags in WordPress
| Method | Advantages | Disadvantages |
|---|---|---|
| "Yoast SEO Plugin" | Easy to use, Comprehensive SEO features, Widely used | Can be overwhelming for beginners, Some advanced features require a premium version |
| "Meta Tag Manager Plugin" | Customizable meta tags, Suitable for specific tags like language and indexing | Less user-friendly compared to Yoast, Limited to meta tag management |
| "header.php File" | Direct control over meta tags, No need for additional plugins | Changes can be lost after theme updates, Requires knowledge of HTML |
| "functions.php File" | Direct control, Can add dynamic meta tags with PHP | Requires PHP knowledge, Changes can be lost after theme updates without a child theme |
FAQs About Adding Meta Tags to WordPress
"1. Can I add meta tags to specific posts or pages using Yoast SEO?"
Absolutely! With Yoast SEO, you can easily add meta tags to individual posts or pages. Just open the post or page editor, scroll down to the Yoast SEO section, and add your meta title and description there.
"2. What are some common meta tags I should consider adding?"
Great question! Some common meta tags include the meta description, meta keywords, author, viewport, robots, and charset. These tags help with SEO, specify authorship, and ensure your site displays properly on different devices.
"3. Is it necessary to use a child theme when adding meta tags in header.php?"
Yes, it's a good idea to use a child theme when editing the header.php file. This way, your changes won't get lost during theme updates. A child theme lets you customize your site without messing with the parent theme's files.
"4. How can I verify if my meta tags are correctly implemented?"
You can use online tools like the W3C Markup Validation Service or SEO analysis tools like Ahrefs or Moz. These tools will help you check if your meta tags are correctly implemented and valid.
Thanks for sticking with us through this guide on adding meta tags to WordPress! 🌟 Meta tags might seem like a small detail, but they can have a big impact on your site's SEO and click-through rates. By crafting effective meta titles and descriptions, using structured data, and continually testing and tweaking, you can make your WordPress site stand out in search results and attract more visitors.
For more tips on optimizing your WordPress site, check out our guide on how to add expires headers to WordPress. Happy optimizing! 😊🚀
Advertisement
