Add expires headers WordPress [2026] 💥

Want to learn how to add expires headers to WordPress? 🌟 Expires headers help browsers decide if they should load web pages like images from the visitor's cache or from your server. They can seriously boost your site's performance. Let's dive into how to add expires headers to WordPress!
Advertisement
How does WordPress use Expires Headers?
When someone visits your WordPress site for the first time, every file is loaded individually. This slows down your page. But browser caching can save some of these files on the visitor's computer. So next time, the page loads faster! 🚀
But how do browsers know which files to save and for how long? That's where **expires headers** come in! You can set rules for which files to save and how long to keep them. We'll focus on expires headers since they’re easier for most users. Expires headers set an expiration date for each file type in the cache. After that date, the server reloads the files to ensure the visitor gets the latest version. We'll show you two ways to add expires headers. The first method is easier for most users.
1. Using the Cache Plugin WP-Rocket
WP-Rocket is the easiest caching plugin for WordPress. It speeds up your site instantly without complicated settings. WP Rocket is a premium plugin, but all features are included in the lowest plan.
First, install and activate WP Rocket. For more info, check out our step-by-step guide on installing a WordPress plugin. Once activated, WP Rocket automatically turns on browser caching. It adds cache-control headers and expires headers to boost your site's speed. That's it! 🎉
If you prefer another plugin, try W3 Total Cache. It has similar features but isn’t as user-friendly. You’ll need to manually enable expires headers with W3 Total Cache.
2. Add Expires Headers in WordPress with Code
Adding code to your WordPress files can add expires headers. This method isn’t recommended for beginners since coding mistakes can cause serious errors. We recommend backing up your WordPress site before making any changes. Check out our guide on how to backup and restore your WordPress site for more info. Now, let’s add those headers! 🛠️
Check if your website is running Apache or Nginx (A/B)
First, determine if your site uses Apache or Nginx servers. Open SSH or Putty on your server and run this command: If you’re unsure, ask your server host. It’s usually Apache unless you have a premium managed WordPress hosting like WP Engine.
httpd -vExpect a result like this:
Server version: Apache/***Also, run this command:
Nginx -vExpect a result like this:
Nginx version: nginx/1.14.0 (Ubuntu)A. Add Expires Headers in Apache
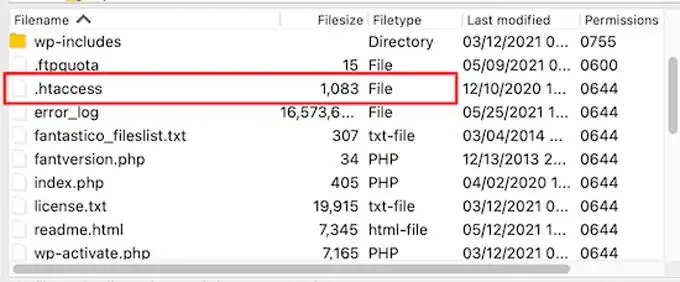
To add expires headers for an Apache server, add the code to your .htaccess file. Use an FTP client to edit this file in your site’s root folder.
Add this code to your .htaccess file:
## EXPIRES HEADER CACHING ##

ExpiresActive On
ExpiresByType image/jpg "access 1 year"
ExpiresByType image/jpeg "access 1 year"
ExpiresByType image/gif "access 1 year"
ExpiresByType image/png "access 1 year"
ExpiresByType image/svg "access 1 year"
ExpiresByType text/css "access 1 month"
ExpiresByType application/pdf "access 1 month"
ExpiresByType application/javascript "access 1 month"
ExpiresByType application/x-javascript "access 1 month"
ExpiresByType application/x-shockwave-flash "access 1 month"
ExpiresByType image/x-icon "access 1 year"
ExpiresDefault "access 3 days"

## EXPIRES HEADER CACHING ##
B. Add Expires Headers in Nginx
For Nginx servers, modify the server configuration file to add expires headers. Accessing and editing this file depends on your host. Contact your hosting provider if you have questions. Add this code to set expiration times for different file types:
location ~* \.(jpg|jpeg|gif|png|svg)$ {
  expires 365d;
}

location ~* \.(pdf|css|html|js|swf)$ {
  expires 3d;
}
This code sets expiration times for various file types. Notice that images are cached longer than HTML, CSS, and JS because images usually stay the same.
Comparing Cache Plugins for WordPress
| Plugin | Features | Ease of Use | Pricing |
|---|---|---|---|
| WP Rocket | Browser caching, cache preloading, GZIP compression, lazy loading | Very user-friendly with simple setup | Premium, starting at $49/year |
| W3 Total Cache | Page cache, database cache, object cache, browser caching | More complex, requires configuration | Free with optional premium features |
| WP Super Cache | Static HTML file generation, CDN support, cache rebuild | Moderately easy to set up | Free |
| Comet Cache | Simple cache options, automatic cache clearing, GZIP compression | Easy to use with basic settings | Free and Pro version starting at $39/year |
| Cache Enabler | Efficient disk cache, WebP support, multisite support | Easy to use with minimal configuration | Free |
Adding expires headers to your WordPress site can significantly boost your website's performance and improve user experience. Whether you choose to use a plugin like WP Rocket for a quick and easy setup or decide to manually add code for more control, the benefits are clear. Don't forget to back up your site before making changes, especially if you're editing code. Happy optimizing! 🚀
Advertisement


