How to find and fix 404 errors [2026] 💥

A 404 error code indicates that the page is not found. It could be that the URL's content has been deleted or that there wasn't any. The web browser only knows that the requested content can't be found at this address. Okay, let's talk about how to find and fix these 404 issues on your website.
Advertisement
1. Finding 404 errors using a free website
The easiest way to find your 404 errors on a site that doesn't charge for them is to create a sitemap of all the pages of your website at check-domains.com. A complete overview of all your pages is made and you are also told which pages and image links give a 404 error. As for the images: if the link is not correct, no image will be displayed, very detrimental to the design of your website.
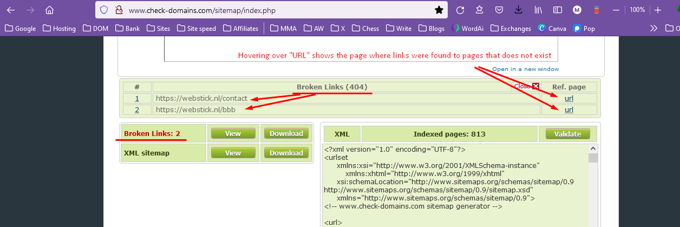
The screenshot above is showing 2 broken links on the left, non existing pages (404). On the right where "URL", hover over the "URL" and it will show you on which pages these broken links were found.
2. Finding 404 errors using a Wordpress plugin
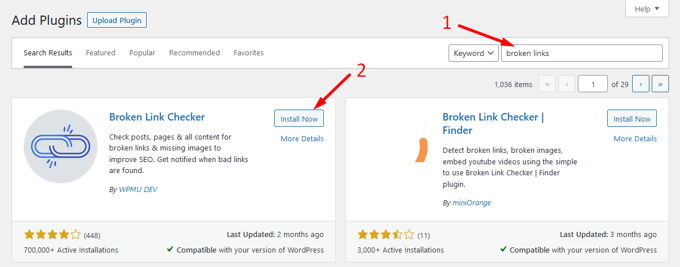
Many of you will use Wordpress website and in that case there are ready-to-use plugins that can detect the 404 errors for you. Jus tlogin to your Wordpresw backend and go to "Plugins" >> "Add new". There use the search box and search "Broken links". Install and activate the "Broken link checker" plugin. The plugin can directly be download from this url. See screenshot below.
3. Finding 404 errors using Google Search Console
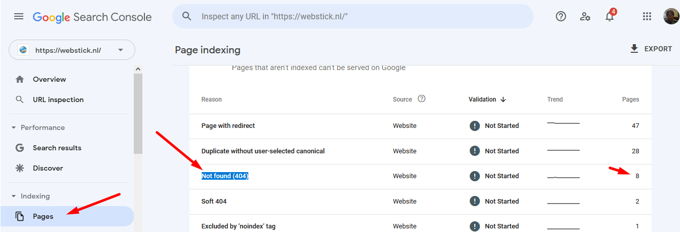
Also Google Search Console can be used to find your 404 errors, but only if you have it active for your website for quite some time already. Otherwise there will not be much information in it. Open Google Search Console, even beter known as Google Webmaster Tools. In the menu on the left, click on "Pages". To the right you will see "Not found (404)" in the list. Click on "Not found (404)" and you will see all 404-errors. See screenshot below.
4. Finding 404 errors using Broken Link Checker by Sitechecker
Broken Link Checker by Sitechecker is a comprehensive solution for identifying and fixing broken links on a website. It scans the website's pages and detects any broken or dead links, providing users with a detailed report that includes the URL of the broken link, the referring page, and the HTTP status code.
Additionally, the tool offers the ability to check broken links on a specific page or throughout the entire website. To use the tool, users simply need to enter the website URL and initiate the scanning process. Once the scan is complete, the tool generates a comprehensive report that highlights all the broken links found on the website, allowing users to take the necessary steps to fix them.
A. Fixing 404 errors adding 301 redirects to .htaccess
You should add a single 301-redirect in your .htaccess file for each 404-error. This file can be found in the public_html of your hosting (turn on show hidden links). Read this short article if you need help finding .htaccess. A re-direct would look like the line of code below. Also look at the screenshot below the code.
Redirect 301 /page-with-404-error https://webstick.blog/page-to-redirect-to
Every line starts with "Redirect 301" then a space, then a slash followed by the slug of the page that cannot be found (without your domain), then a space, then the URL where to re-direct to (with https:// and the domain). Using "www" depends on what kind of URLs your website is using. Read this article of ours if you need more info on how to set up a 301 redirect.
B. Fixing 404 on a Wordpress website with a plugin
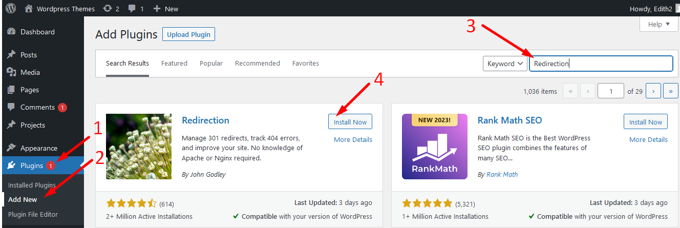
We will use the "Redirection” plugin. Download it, install it and activate it. You can also go to "Plugins", click "Add new" to use the searchbox. You'll find the plugin at the first spot if you search for "Redirection". You can then install it and activate it directly without needing to upload any files.
After activation is complete, go to Tools in the left menu in your WP-backend and click "Redirection". Here you can enter both the old URL and the destination URL. Next, click on "Add redirection". This completes the setup for 301 redirects.
Advertisement
