How to Set Up a 301 Re-Direct [2026] 💥

A 301 redirect is used to direct search engines and website visitors to a URL that isn't listed in search engine results pages. It is also not the URL they originally typed in their browsers. A few reasons why one would set up a 301 Redirect are: moving website from http to https, broken URLs or pages, any reason to alter URLs, problems with dynamic URLs, changing or merging domains.
Advertisement
1. Setting up a 301 Redirect editing the .htaccess file
To be able to edit the .htaccess file, you have to know where to find it. Its location is the root of your hosting, called public_html on a Linux server and httpdocs on a Windows server. If you need more information about where to find the .htaccess file, the read this extensive article about it and then come back here.
If there is no .htaccess file then we have to create one first. To do this create a text-file named .htaccess on your laptop and upload it to your public_html. Easier is to create the file directly in the public_html by clicking on "+File" in the menu and name it .htaccess.
All right. Open the .htaccess file, let's edit it. There are so many different re-directs we can put in .htcess, but this article is just about the 301 Redirect. For other Redirects please read on here.
In the .htaccess file we write the following code shown below at the bottom of the file. For each redirect you create a new line. Also have a look at the screenshot to understand the idea of it.
Redirect 301 /page-with-404-error https://webstick.blog/page-to-redirect-to
Every line starts with "Redirect 301" then a space, then a slash followed by the slug of the page that cannot be found (without your domain), then a space, then the URL where to re-direct to (with https:// and the domain). Using "www" depends on what kind of URLs your website is using.
2. Setting up a 301 Redirect using a Wordpres plugin
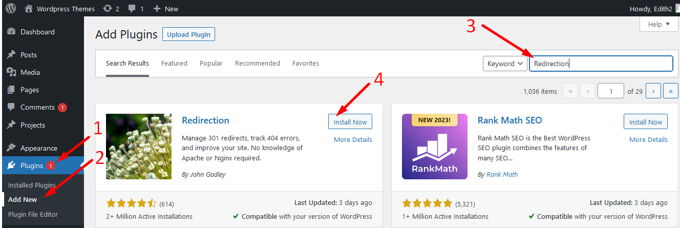
We are going to use the "Redirection" plugin, download it here and install and activate it. Another possibility is to go to "Plugins" >> "Add new" and use the searchbox. Search for "Redirection" and you'll find the plugin on the first spot. From there you can directly install and activate it without having to upload anything.

Once you've completed the activation, go to the Tools section and click "Redirection" for your redirects. This is where you can insert both the old URL along with the destination URL. Once you have entered both URLs, click on "add redirection". This will complete the setup process for 301 redirects.
Advertisement
