Zoho Mail Set Up with Cpanel [2026] 💥

Advertisement
Zakra theme review: Rating
Using Zoho Mail for your own domain provides quite a few benefits such as spam filters, calendar options, being able to share your mail via social media and more. In this tutorial, I'll quickly teach you how to install Zoho Mail yourself. Zoho Mail works with Cpanel as well as all Hosting providers that use Cpanel such as Go-Daddy and also WHMCS which is a lesser known program for managing invoices.

ZOHO MAIL TUTORIAL
Add Zoho CNAME record in cPanel (Authentication)
1. Log in to cPanel.
2. Now go to "Zone Editor" in the "Domains" section.

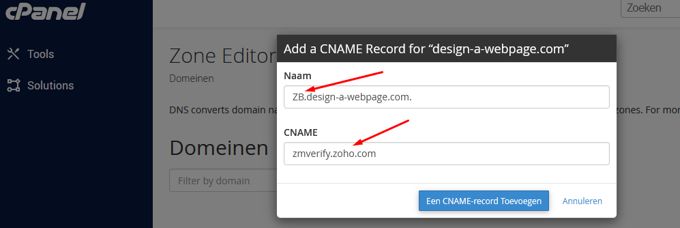
3. On the other side of the domain, click Add CNAME record.

4. Enter the "ZB Code" provided by Zoho in the "Name" field. You do that by entering only "ZB", the rest will be added automatically. In the "CNAME" field, enter "zmverify.zoho.com".

5. Now click on the "Add" button.
Update MX-records in cPanel.
1. Within the "Zone Editor" go to the "Manage" option which is on the far right of the domain.

2. Remove the default configured MX servers in your Hosting using the "Remove" button on the right side of each record. It can be 1 or 2 records, that is not the same everywhere, remove all MX records you find in any case.

3. Now add the Zoho Mail MX records and click the "Add record" button. Below the text field on the left, you can optionally filter by record type.

4. Add the following MX records, each with a priority level as specified by Zoho. When you are done loading each, you need to save by clicking the "Add Record" button.
- Enter 10 as the priority and mx.zoho.com as the destination for the first. Now click on "Add".
- Now add another one with 20 as priority and mx2.zoho.com as destination, and press the "Add" button.
- Finally add another with 50 as priority and mx3.zoho.com as destination. Finish by clicking "Add".

Update email routing.
1. Go back to your cPanel panel home page. You do this by clicking on the Cpanel logo at the top left.
2. Find and click on "Email Routing" in the "Email" section.

3. Check the "Remote Mail Exchanger" option and then click "Change" as below screenshot shown.

Finished! Your domain's email address now points to Zoho Mail. Don't forget to create your email accounts. When you're done making the changes, keep in mind that everything will only start working for 4 to 24 hours, depending on your ISP's DNS cache.
Advertisement
