Turn Off WordPress Auto-Update [2026] 💥

Automated updates in WordPress are generally a good thing. We recommend that users leave them enabled for security reasons. Some users may find it beneficial to disable all or some of the automatic updates.
WordPress automatic updates can sometimes cause a website to crash. This is why you should disable them. Most updates are well tested and will not cause any issues. This holds true for WordPress core as well as popular themes updates, and plugins.
Advertisement
1. Turn On/Off Plugins with Automatic Updates
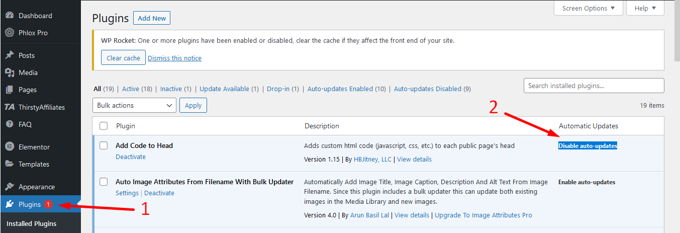
This does not count for themes, but your plugins already have a feature to turn off Wordpress auto update. In your Wordpress backend just click on "Plugins" in the menu. At the end, next to each plugin you have the option to "Disable auto-updates" or "Enable auto-updates". See screenshot below.

2. Turn On/Off Auto Update for Wordpress itself
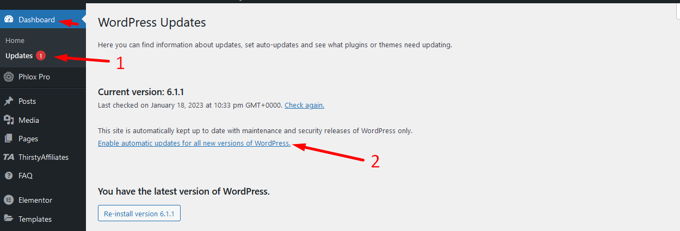
Wordpress itself also has the option of disabling/enabling the auto updates. In your Wordpress backend just click on "Dashboard" >> "Updates" in the menu. Now on the right hand side just click on "Enable Automatic Updates for all new Versions of Wordpress". See screenshot below. Of course this is only possible if it is not yet enabled. If enabled already click on "Switch to Automatic Updates for Maintenance and Security Releases only".

3. Turn Off Auto Update for Wordpress with Code Snippets
a. Add Code to Your wp-config.php
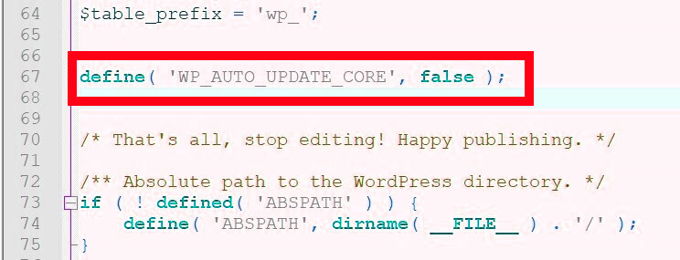
You find the wp-config.php file in the public_html of your hosting. You have to add the code below to it just above the text "That's all, stop editing. Happy publishing." See screenshot below.
define( 'WP_AUTO_UPDATE_CORE', false );
WordPress won't install updates anymore automatically. This applies only to WordPress core updates. If you wish you can also disable updates for plugins and/or themes by following the next step.
a. Add Filter Code to Your functions.php
You can stop plugins or themes from automatically updating by adding a line to your theme's functions.php. This file doesn't require a file browser, FTP client or file browser. You can access it by going to your WordPress dashboard and selecting "Appearance" >> "Theme File Editor" >> Select your theme >> Open functions.php.
Of course, this file can also be edited using Cpanel or an FTP-client. Also, it is better to work with a child theme so you won't lose the changes we are about to make when upgrading your theme.
Add the following code at the bottom of your file to turn of auto plugin updates:
add_filter( 'auto_update_plugin', '__return_false' );And add the following code at the bottom of your file to also turn of theme updates:
add_filter( 'auto_update_theme', '__return_false' );4. Turn Off Wordpress Auto Update with a Plugin
we are going to use the Easy Updates Manager plugin. This plugin allows you to manage all updates on your WordPress site including themes and plugins. Go to your WordPress dashboard, and click on "Plugins" >> "Add New" to install the plugin. Search for "Easy updates manager" and you will find it as the first choice. Click on "Install", then "Activate".
Easy Updates Manager gives you incredibly precise control over all updates on your website. Go to your WordPress dashboard, click on the new link in the sidebar that says "Updates Options". See screenshot below.

The configuration of the plugin speaks more or less for itself. I see no need to explain all details of it, I reckon you are smart enough to create the settings you want. Good luck!
Advertisement
